I want to run a new wire to install some additional outlets. Do I have to run these wires through the wall?
You can use surface wire channels that allow you to run the wire on the outside of the wall and still maintain an attractive... More »
One of the best reasons for mounting your new flat panel TV on the wall is the sleek and stylish look that it gives the entire room. Just look at how it complements our fireplace. What’s not so sleek and stylish, however, are all the cords and cables dangling from below the TV, running across the mantle and down the wall. We’re going to tie into an existing electrical outlet and run new electrical wire and TV cables up through the wall.
One of the best reasons for mounting your new flat panel TV on the wall is the sleek and stylish look that it gives the entire room. Just look at how it complements our fireplace. What’s not so sleek and stylish, however, are all the cords and cables dangling from below the TV, running across the mantle and down the wall. What an eyesore. To hide them, we’re going to run these wires through the wall and up to a point behind the TV where they will be out of sight, hidden from our view.
Today, in this first of a two-part series on wiring a wall-mounted flat panel TV, we’re going to tie into an existing electrical outlet and run new electrical wire and TV cables up through the wall. Then we’ll make a 90-degree turn and route the wiring through several studs before we reach our destination behind the TV. In the next video, we’ll install an electrical box and receptacles and connect the wires and cables. Now before we begin, if you have any hesitation about working with electricity or hooking up electrical components, it’s best to call a licensed electrician to do the work. But if you’re ready to raise your DIY electrical skills a few notches, then let’s get started.
The first step when working with electricity is always to turn off the power feeding the circuit you’re working on at the breaker box. You might need to set up a work light plugged into an outlet on a different circuit. Check the outlet with a tester before starting to make sure it’s safe to examine the existing outlet that we’ll tie into. Lucky for us it’s at the end of a circuit, which will make wiring much easier. This is evident by the single wire cable entering the electrical box. Common types of cable for residential electrical work include 14/2 and 12/2 non-metallic sheathed cable. We’ll use 12/2 because it’s the same gauge as the existing wire supplying the box. The first number represents the gauge of the wire, where the lower the number, the thicker the wire. The second is the number of wires inside the cable. This cable also includes a ground wire. We’ll also take this opportunity to install double-gang boxes at both ends to accommodate both the electrical outlet as well as our TV cable and wiring. But more on that in the next video.
After recruiting some help to remove the TV, and taking down anything else in the way, we’ll use this stud finder to locate the wall studs and any other obstacles blocking the path. After investigation, it looks like there are two wall studs we’ll have to drill through en route to our final destination. We also made sure there weren’t any plumbing or electrical lines in the way. We’ve marked everything with a pencil on the wall so we know exactly where all framing members are located. Now, it’s time to use our drywall saw and cut some strategic holes in our drywall to provide room to drill holes through the wall studs so we can run our wiring and cable.
The hole we’ll cut starts directly above the existing outlet and ends near the new outlet that will be placed above our TV bracket. We’ll cut a rectangular strip across the two studs bays and the studs that we’ll be drilling through, making sure to stop the cut at the last stud. This rectangular strip should be about 8”high so we can keep our line and low-voltage wiring at least 6” apart. This will help avoid any possible electromagnetic interference that might occur between the two wires.
Using a drywall saw, we’ll punch a starter hole and cut carefully so we can reuse the piece during the drywall repair phase of this project. Directly over the studs, we’ll use a blade knife. Using our level as a straightedge for our cuts will help. When we removed the drywall, we found that we had two studs side by side, which goes to show that you never really know what you’ll find when you cut away the drywall. In our case it won’t be a problem.
Now we’ll use the right-angle drill that we rented from our local independent home improvement retailer and a 1-1/2” hole saw to drill a hole directly through the center of each stud. This will create a pathway for our plastic conduit tubing. For the 12/2 electrical cable, we’ll drill a hole 6” above using this 3/4”spade bit. Be sure to drill these holes as straight and level as possible so the wires or conduit won’t snag as we pull it through. For more on drilling through studs, see our list of frequently asked questions for this video.
Now we’ll cut a hole for the new electrical box on the other side of the last stud we drilled through, using the electrical box as a template. We’ll also cut an access hole to make fishing the wires and cables easier. We’ll premeasure the 12/2 cable so we can see how far we need to feed it down the wall.
At this point we’ll pull the cables through the holes in the drywall we just created. We’ll start at our highest opening on the wall and push the cable down through the stud bay to the hole that will house our new electrical box. We’ll repeat the same process for our plastic conduit, which we’ve pre-loaded with both our HDMI and coaxial cables, taped together at the ends so they won’t slip down into the conduit. If we hit any snags, we’ll use this fish tape to help pull the cable or conduit on through. Now we’ll head across the wall, first with our electrical cable, then with the plastic conduit.
There you have it. We’ve got our wiring run and in place. In the next video, we’ll install an electrical box and the needed receptacles to house and connect our electrical wires and TV cables.
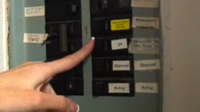
Open the breaker box and turn off the electricity to the area you'll be working in. Use a work light if you need light.
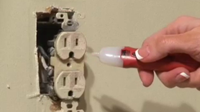
Make sure the power is off near the outlet you'll be working with using a voltage tester.
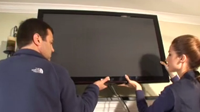
Remove all wall-mounted items from the area that you will be running the wires.
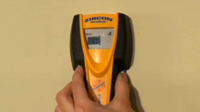
Locate the studs and plumbing in the wall using a stud finder. Mark these locations with a pencil.
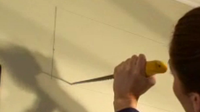
Measure and draw the lines where you want to cut out the drywall. Then cut through with a drywall saw. Save the cut piece so you can place it back in after the project is complete.
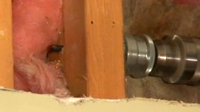
Cut a hole through each stud using a right-angle saw and a 1-½" hole saw. This will create a pathway for our plastic conduit tubing.

For the electrical cable, we’ll drill a hole 6” above using this 3/4”spade bit.
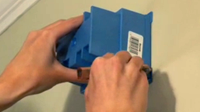
cut a hole for the new electrical box. Also cut a hole near the floor outlet to make the job of pushing the wire through easier.
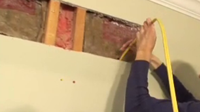
Start pushing the wire through the highest point in the wall and work your way down. Feed the wire and cables through the holes until everything is in place.
You can use surface wire channels that allow you to run the wire on the outside of the wall and still maintain an attractive... More »
Instead of trying to feed the wire through, use a fish tape. This tool is a small wire on a real that is easier to feed through. Once you have fed... More »
If you lay cable underground, it must be UF (underground feed) cable, which has each individual wire insulated and has plastic wound around the... More »
Strip off about ½ inch of insulation from the wires you want to connect. Hold these wires next to each other and twist clockwise. Screw on the... More »
No. Snips are only designed to cut sheet metal. When cutting wire, always use wire... More »
While 14-guage wire is the minimum for most houses wiring, it can only be used for 15-amp circuits. Number 12-gauge wire is recommended for general... More »
Plastic will usually last much longer than chrome, but you have to be careful because it can be affected by some harsh chemicals in drain... More »
The best choice is one is a three-wire cable with a ground. Also, make sure it’s rated for the amperage you... More »
A combination wire stripper tool has openings that fit different sizes of wire. When a wire is put into the correct one and pulled it will remove... More »
Check the package, it will tell you what size and how many wires each color of nut will... More »
In the first video on running electrical wire and cable through the wall, we ran wires up to a spot directly behind where our flat-panel TV is... More »
Changing an electrical outlet/receptacle may seem intimidating, but it’s an easy project, as long as you follow the proper procedures for working... More »
One of the best ways to save on your heating and cooling costs is to install a ceiling fan that will circulate cool air in the summer and warm air... More »
Changing a light fixture is an easy way to add some design flair to a room. All it takes is the right tools and some basic knowledge of hooking up... More »
Are your light switches old and dingy? Replacing a regular light switch with a decorative one can add some design flair to any room in your home.... More »
There is not only an art to hanging pictures and other decorative pieces on walls, there is a science to it. You need the right hardware and hollow... More »
No matter how big or small it is, a hole in the wall is an unsightly blemish that won’t go away by itself. Watch this video to learn how to fix... More »
One of the handiest appliances in your kitchen is probably something you don’t think about very often, until it stops working. It’s your garbage... More »
In this final segment of our 3-part home weatherization series, we’ll be up in the attic preparing to add a layer of insulation. But before we... More »
While at times she can be hard to buy for, your mother deserves something special and unique for that upcoming birthday or Mother’s day. Why not... More »